Featured Exhibits
Sign up for the Newsletter
Advertise on ParachuteHistory.com
Disclaimer
Privacy Policy
About
PRO Pack: Steps 1-5
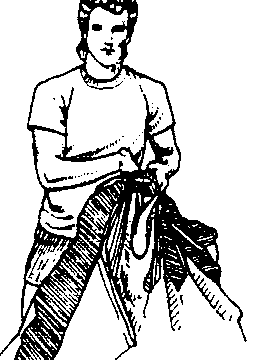
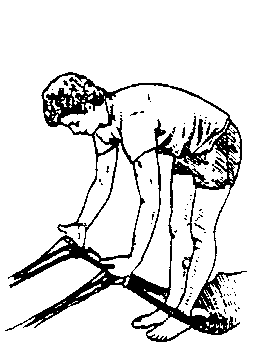 1. Lay your rig face down on the ground. Stand between the risers
and face your canopy. Slip a finger between the front and rear
risers and between the control line and the rear riser on each
side of the canopy. The idea is to have each line group and each
steering line occupy its own slot between two of your fingers.
1. Lay your rig face down on the ground. Stand between the risers
and face your canopy. Slip a finger between the front and rear
risers and between the control line and the rear riser on each
side of the canopy. The idea is to have each line group and each
steering line occupy its own slot between two of your fingers.
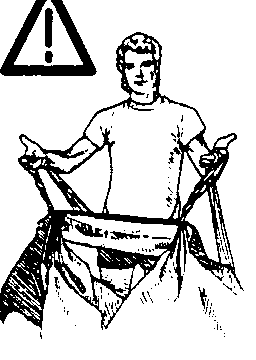 2. LINE CHECK: Move towards the canopy with the line groups and
control lines still separated by your fingers. Push the slider
ahead, until you reach the lower surface of the canopy. At this
point, it's possible to determine whether or not your canopy and
lines are straight. Your canopy will look like this figure if
the container has been looped through the lines. Lay the canopy
down and work out the entanglements and twists from the canopy
towards the container before proceeding further. Seek help from
a rigger if you have any questions. Repeat the line check after
clearing to confirm you have done it correctly.
2. LINE CHECK: Move towards the canopy with the line groups and
control lines still separated by your fingers. Push the slider
ahead, until you reach the lower surface of the canopy. At this
point, it's possible to determine whether or not your canopy and
lines are straight. Your canopy will look like this figure if
the container has been looped through the lines. Lay the canopy
down and work out the entanglements and twists from the canopy
towards the container before proceeding further. Seek help from
a rigger if you have any questions. Repeat the line check after
clearing to confirm you have done it correctly.
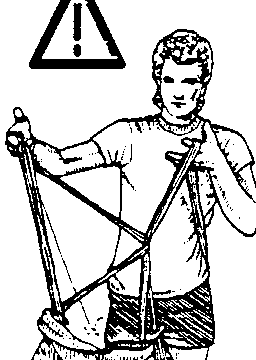 3. If you have something that looks like this, it's likely that
a control line passed around the canopy or the container.
3. If you have something that looks like this, it's likely that
a control line passed around the canopy or the container.
A CONTROL
LINE THAT PASSES AROUND THE CANOPY OR CONTAINER WILL RESULT IN
A MALFUNCTION THAT WILL ALMOST CERTAINLY REQUIRE A BREAKAWAY.
Lay the canopy down on the ground and work from the canopy towards
the risers to remove the entanglements. Find the B and C lines
on one end cell (these are the second and third lines, respectively,
from the leading edge). Carefully follow these two lines down
through the slider to the links on the risers. You should be able
to see where you will need to pass your rig through the lines
to correct the steering line routing. Again, seek the capable
assistance if you have any questions.
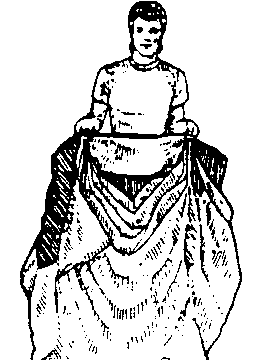 4. Your canopy will look like this when you have pushed the slider
all the way towards the canopy during the line check and after
the removal of all entanglements and twists. Pull both hands apart
as far as the slider will allow. Shake the canopy a couple of
times to settle everything.
4. Your canopy will look like this when you have pushed the slider
all the way towards the canopy during the line check and after
the removal of all entanglements and twists. Pull both hands apart
as far as the slider will allow. Shake the canopy a couple of
times to settle everything.
 5. FLAKE THE LEADING EDGE: Step to one side, outside of the lines
and transfer the lines in one hand to the other...
5. FLAKE THE LEADING EDGE: Step to one side, outside of the lines
and transfer the lines in one hand to the other...
[Products] | [Services]
[Join Our Mailing List] | [Advertise on ParachuteHistory.com]
[ ]
[Disclaimer] | [Privacy Policy] | [About]